Javascript
Three.jsを使って3D製品ページを作成してみよう
イブリン
更新日:2022/10/26
最近私は、three.js開発にドハマリしており、今はthree.jsを使ってvr、AR、MR(これは苦戦しそう)に挑戦しています。
今回はwebpackを利用してThree.js開発をしてみたので、webpackの概要と利用手順を紹介しつつ、
実際の作品を紹介したいと思います。
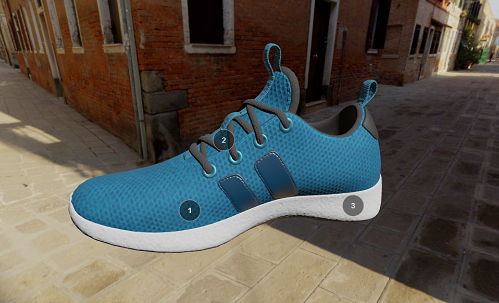
サンプル
※動画の処理が重いため、動画ではかくついていますが、実際はもっとなめらかです
Three.jsとは?
Three.js は、できるだけ簡単にWebページ上に3Dコンテンツを表示する3Dライブラリです。
詳細は@【こちら】
Webpackとは?
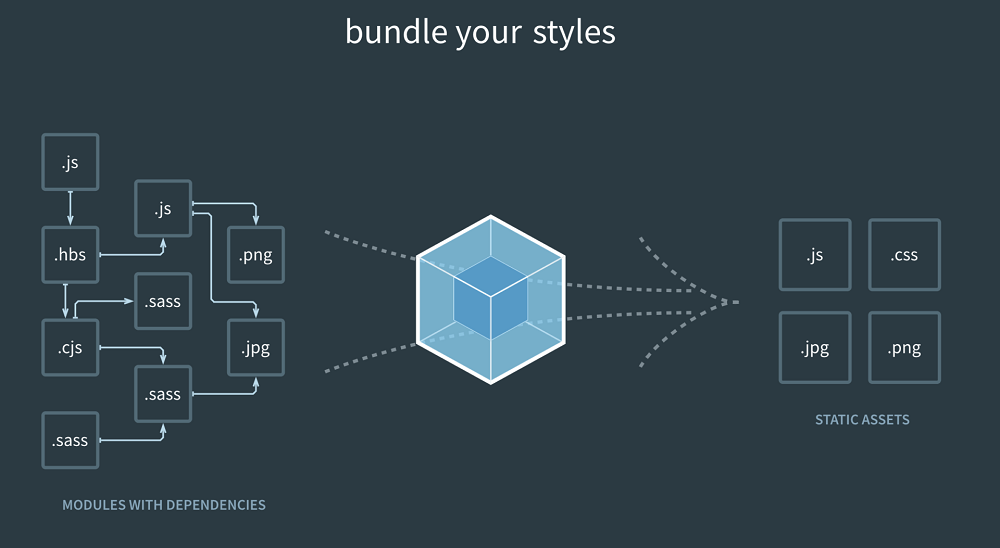
webpackとはモジュールバンドラーのことを言います。
モジュールバンドラーとは
複数モジュールを依存関係を解決して1つにまとめるものでこの1つのまとめることを
バンドリングすると言います
モジュールとは、
それ単体で使うというより、組み合わせて個々のプログラムのこと
バンドラーとは、
Javascript、CSS、HTML、画像、TypeScript、Styls、その他の言語などのアセットを送信するサーバーツールで、
バンドラーはこれらのアセットを処理し、潜在的な変更を適応し、HTML、CSS、画像、JavascriptなどのWEB対応ファイルで構成されている「バンドル」を出力します。
Three.js × webpack
今回は、three.jsをwebpackを使って実現しました。
Three.jsは、過去の記事にあたようにthree.jsを読み込む方法も可能ですが、
メッシュを作ったり、シェーダーを書いたりするためには準備しなければいけないものが多いため、jsを読み込む量がかなり増えます。
たとえばまずThreejsを読み込んで
①カメラとレンダラーとシーンを用意してステージを作成
②ジオメトリーとマテリアルからメッシュを作成してシーンに追加
③リクエストアニメーションフレームでループを回しメッシュを描画
といった複雑に組み合わさってできています。
さらにOrbitControlsでカメラを動かしたり、dat.guiで数値もぐりぐり動かしたい。
シェーダーは別ファイルから読み込めるようして可読性を担保したいし、
アニメーションにGSAP(ジーサップ)をつかいたい
など3Dを描画する以外にも追加したい機能が多くjavascriptの読み込む量が多いです。
複数のjavascriptを読み込むと、javascriptの読み込む順番が必要になってきたり、を読み込まなくてはならず大変です。
そのようなときにwebpackを使うことで複数のjavascriptをちょうどいい感じに1つにまとめてくれて、javascriptを読み込んでくれるので、扱いやすくなります。
(※ただ、1つにまとめることで重くもなりやすいので注意が必要です。)
さらにcssとjsのビルドもしてリントも通したいなども可能です。
そのためthree.js開発には、最適で、webpackは多くのこと解決してくれます。
webpackの環境とインストール方法
バージョン
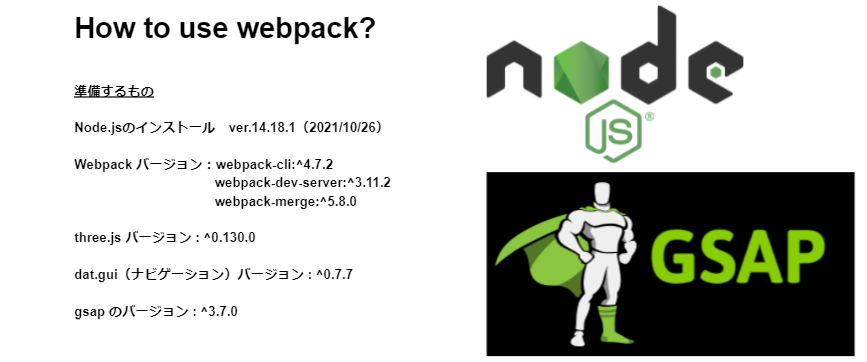
実装前に、node.js と webpack、three.jsのバージョンはそれぞれ確認する必要があります。
バージョンによっては、互換性がなかったり、書き方が変わったりするので、確認してください。
私はこの沼にハマりました。。。
フォルダ構造
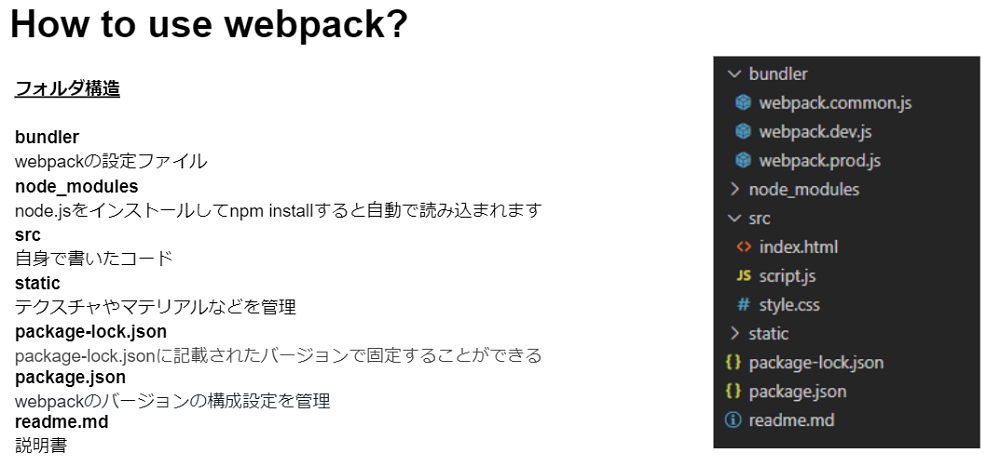
package-lock.jsonが必要な理由
npm installを実行した際にインストールされるパッケージのバージョンをpackage-lock.jsonに記載されたバージョンで固定することができ、全ての開発者で同じパッケージの環境を再現することができます。一方、package.jsonだけしかない場合では、npm installしたときに、それぞれの開発者で別バージョンのパッケージをインストールしてしまう可能性があります。
package.jsonが必要な理由
このドキュメントで説明されている動作の多くは、webpackのバージョンの構成設定を管理しており、影響を受けます
パッケージを公開する場合、package.jsonで最も重要なのは、必要に応じて名前とバージョンのフィールドです。名前とバージョンが一緒になって、完全に一意であると見なされる識別子を形成します。パッケージへの変更は、バージョンへの変更と一緒に行う必要があります。パッケージを公開する予定がない場合、名前とバージョンのフィールドはオプションです。
インストール手順
1.Node.jsをインストール
こちらの公式サイトからバージョンを確認をして、インストーラーをダウンロードしてください。
2.コマンド(CMD)を立ち上げて、Node.jsのバージョンを確認をする(※macの場合はターミナル)
|
1 2 3 4 5 |
D:\>node --version v14.17.0 D:\>node -v v14.17.0 |
3.webpackを作成する
1.フォルダを作成をする
(※ファイル名をwebpackにしないでください(エラーが起きます)
2. Visual Studio codeのターミナルを開いてpackage.jsonを作成します
|
1 2 |
//package.jsonをインストール F:> npm init -y |
3.webpackの本体をインストール(package-lock.jsonとnode_modeulesが自動的にインストールされる)
|
1 2 |
//webpackの本体をインストール(package-lock.jsonとnode_modeulesが自動的にインストールされる) F:> npm i -D webpack webpack-cli |
4.index.jsとモジュールフォルダを作成
|
1 2 3 4 |
// import{test} from "./sub"; test(); |
|
1 2 3 |
export function test(){ alert("TESTメソッド実行"); } |
5.webpackでビルドして、modeを作成
|
1 2 3 4 5 6 |
//webpackを使ってビルド F:> npx webpack //modeを設定してくださいとエラーがでるため //develpmentを作成 F:> npx webpack --mode development |
6.buildとprodの環境を設定
|
1 2 3 4 |
"scripts": { "build": "webpack --config ./bundler/webpack.prod.js", "prod": "webpack serve --config ./bundler/webpack.dev.js" }, |
|
1 2 |
F:> npm run build F:> npm run prod |
7.package.json のscriptsに下記を追加します。
|
1 2 3 |
"scripts": { "start": "webpack-dev-server" }, |
4.webpack.common.jsを作成
|
1 2 3 4 5 6 7 8 9 10 11 12 13 14 15 16 17 18 19 20 21 22 23 24 25 26 27 28 29 30 31 32 33 34 35 36 37 38 39 40 41 42 43 44 45 46 47 48 49 50 51 52 53 54 55 56 57 58 59 60 61 62 63 64 65 66 67 68 69 70 71 72 73 74 75 76 77 78 79 80 81 82 83 84 85 86 87 88 89 90 91 92 93 94 95 96 97 |
const CopyWebpackPlugin = require('copy-webpack-plugin') const HtmlWebpackPlugin = require('html-webpack-plugin') const MiniCSSExtractPlugin = require('mini-css-extract-plugin') const path = require('path') module.exports = { entry: path.resolve(__dirname, '../src/script.js'), output: { filename: 'bundle.[contenthash].js', path: path.resolve(__dirname, '../dist') }, devtool: 'source-map', plugins: [ new CopyWebpackPlugin({ patterns: [ { from: path.resolve(__dirname, '../static') } ] }), new HtmlWebpackPlugin({ template: path.resolve(__dirname, '../src/index.html'), minify: true }), new MiniCSSExtractPlugin() ], module: { rules: [ // HTML { test: /\.(html)$/, use: ['html-loader'] }, // JS { test: /\.js$/, exclude: /node_modules/, use: [ 'babel-loader' ] }, // CSS { test: /\.css$/, use: [ MiniCSSExtractPlugin.loader, 'css-loader' ] }, // Images { test: /\.(jpg|png|gif|svg)$/, use: [ { loader: 'file-loader', options: { outputPath: 'assets/images/' } } ] }, // Fonts { test: /\.(ttf|eot|woff|woff2)$/, use: [ { loader: 'file-loader', options: { outputPath: 'assets/fonts/' } } ] }, // Shaders { test: /\.(glsl|vs|fs|vert|frag)$/, exclude: /node_modules/, use: [ 'raw-loader' ] } ] } } |
5.three.jsのパッケージをインストールする
1.three.jsパッケージをインストール
|
1 |
F:> npm install three --save |
サンプルのつくりかた
こちらのthree.js公式サイトのサンプルを使用しています。(詳細はこちら)
すべてのコードを掲載するわけではないですので、必要な箇所のみ記載しています
マテリアルやカメラの、ライトなどの入れ方は過去の記事に詳細が記載されていますのでご確認ください。
ポインタの作成
HTML(index.html)
|
1 2 3 4 5 6 7 8 9 10 11 12 13 14 15 16 17 18 19 20 21 22 23 24 25 26 27 28 |
<!DOCTYPE html> <html lang="en"> <head> <meta charset="UTF-8"> <meta name="viewport" content="width=device-width, initial-scale=1.0"> <title>32 - Mixing HTML and WebGL</title> </head> <body> <canvas class="webgl"></canvas> <div class="loading-bar"></div> <div class="point point-0"> <div class="label">1</div> <div class="text">Front and top screen with HUD aggregating terrain and battle informations.</div> </div> <div class="point point-1"> <div class="label">2</div> <div class="text">Ventilation with air purifier and detection of environment toxicity.</div> </div> <div class="point point-2"> <div class="label">3</div> <div class="text">Cameras supporting night vision and heat vision with automatic adjustment.</div> </div> </body> </html> |
CSS(style.css)
|
1 2 3 4 5 6 7 8 9 10 11 12 13 14 15 16 17 18 19 20 21 22 23 24 25 26 27 28 29 30 31 32 33 34 35 36 37 38 39 40 41 42 43 44 45 46 47 48 49 50 51 52 53 54 55 56 57 58 59 60 61 62 63 64 65 66 67 68 69 70 71 72 73 74 75 76 77 78 79 80 81 82 83 84 85 86 87 88 89 90 91 92 93 94 95 96 97 |
* { margin: 0; padding: 0; } html, body { overflow: hidden; } .webgl { position: fixed; top: 0; left: 0; outline: none; } .loading-bar { position: absolute; top: 50%; width: 100%; height: 2px; background: #ffffff; transform: scaleX(0.3); transform-origin: top left; transition: transform 0.5s; } .loading-bar.ended { transform: scaleX(0); transform-origin: 100% 0; transition: transform 1.5s ease-in-out; } .point { position: absolute; top: 50%; left: 50%; /* pointer-events: none; */ } .point .label { position: absolute; top: -20px; left: -20px; width: 40px; height: 40px; border-radius: 50%; background: #00000077; border: 1px solid #ffffff77; color: #ffffff; font-family: Helvetica, Arial, sans-serif; text-align: center; line-height: 40px; font-weight: 100; font-size: 14px; cursor: help; transform: scale(0, 0); transition: transform 0.3s; } .point .text { position: absolute; top: 30px; left: -120px; width: 200px; padding: 20px; border-radius: 4px; background: #00000077; border: 1px solid #ffffff77; color: #ffffff; line-height: 1.3em; font-family: Helvetica, Arial, sans-serif; font-weight: 100; font-size: 14px; opacity: 0; transition: opacity 0.3s; pointer-events: none; } .point:hover .text { opacity: 1; } .point.visible .label { transform: scale(1, 1); } |
Javascript(script.js)
|
1 2 3 4 5 6 7 8 9 10 11 12 13 14 15 16 17 18 19 20 21 22 23 24 25 26 27 28 29 30 31 32 33 34 35 36 37 38 39 40 41 42 43 44 45 46 47 48 49 50 51 52 53 54 55 56 57 58 59 60 61 62 63 64 65 66 |
** * ポイントの位置指定 */ const raycaster = new THREE.Raycaster() const points = [ { position: new THREE.Vector3(1.55, 0.3, - 0.6), element: document.querySelector('.point-0') }, { position: new THREE.Vector3(0.5, 0.8, - 1.6), element: document.querySelector('.point-1') }, { position: new THREE.Vector3(1.6, - 1.3, - 0.7), element: document.querySelector('.point-2') } ] // シーンの準備ができたらときのみポイントを表示 if(sceneReady) { // Go through each point for(const point of points) { // Get 2D screen position const screenPosition = point.position.clone() screenPosition.project(camera) // Set the raycaster raycaster.setFromCamera(screenPosition, camera) const intersects = raycaster.intersectObjects(scene.children, true) // No intersect found if(intersects.length === 0) { // Show point.element.classList.add('visible') } // Intersect found else { // Get the distance of the intersection and the distance of the point const intersectionDistance = intersects[0].distance const pointDistance = point.position.distanceTo(camera.position) // Intersection is close than the point if(intersectionDistance < pointDistance) { // Hide point.element.classList.remove('visible') } // Intersection is further than the point else { // Show point.element.classList.add('visible') } } const translateX = screenPosition.x * sizes.width * 0.5 const translateY = - screenPosition.y * sizes.height * 0.5 point.element.style.transform = `translateX(${translateX}px) translateY(${translateY}px)` } } |
おわりに
three.jsをはじめて1ヶ月が経ちましたが、奥深いものでした。
もともとblenderを使ってモデリングを作成していましたので、それweb上で表現する方法を模索していました。
three.jsは、アニメーションを作成することもできるので、画像の埋め込みや動画の作成したmp4やpngをそのまま掲載するという方法はなかなか少なっていくのではないかと思いました。
私もthree.jsを使いはじめて動画編集ソフトでアニメーションを作成するのをやめてしまった一人です。
皆さんにも3Dモデルの作成やthree.jsの楽しさに一緒にハマりませんか??
参考サイト一覧
Three.js
https://threejs.org/
https://threejs.org/examples/#webgl_loader_gltf_variants
https://threejs-journey.com/
webpack
https://webpack.js.org/
npm
https://www.npmjs.com/
gsap
https://greensock.com/gsap/
node
https://nodejs.org/ja/
